シルエット分析(Silhouette analysis)とは
シルエットは、クラスターの解釈と一貫性な評価の手法です。各クラスターにどれくらいうまくグループしているかを簡潔にグラフィカルに表現します。
シルエット分析は、クラスタリングの結果を評価する事ができます。 シルエットプロットは、1つのクラスター内の各点が隣接するクラスター内のどの点にどれくらい近いかを示すもので、クラスター数などのパラメーターを視覚的に評価する方法です。 この評価の範囲は[-1、1]です。
+1に近いシルエット係数は、標本が隣接するクラスターから遠く離れていることを示します。クラスタリングの分離性能が良いと判断できます。0の値は、隣接する2つのクラスター間の決定境界にあるか、またはそれに非常に近いことを示しており、分離性能が悪い事を示しています。マイナス値だとクラスター化されたサンプルは間違ったクラスターに所属している可能性があります。できる限り1に近い事が目標になります。
実験:
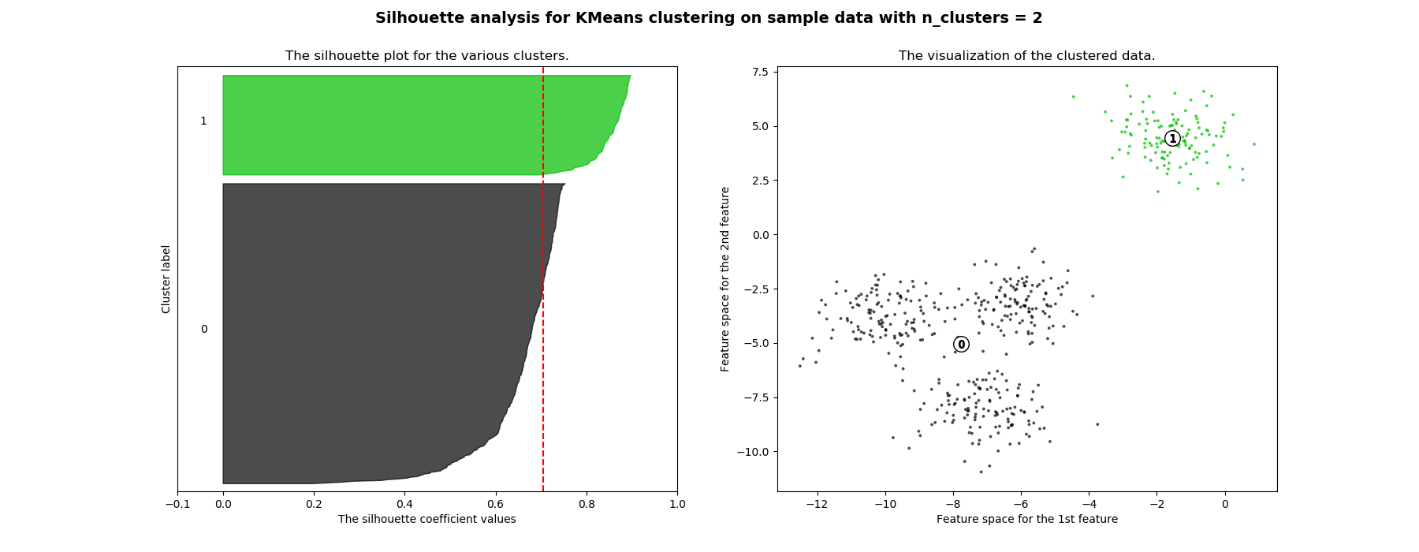
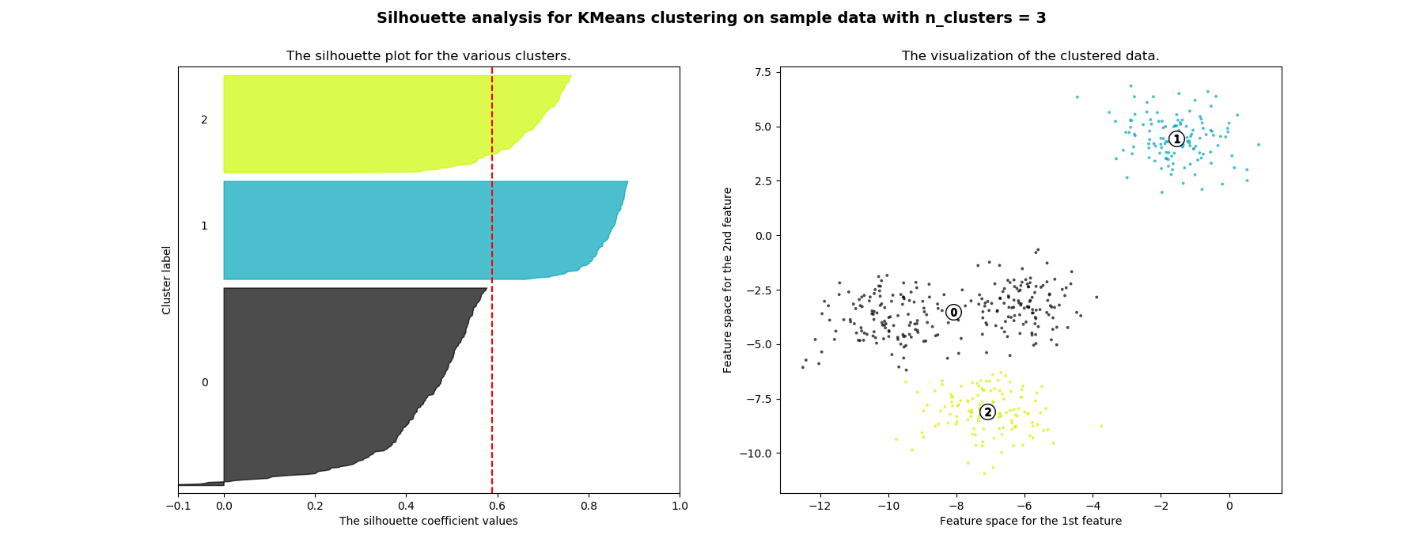
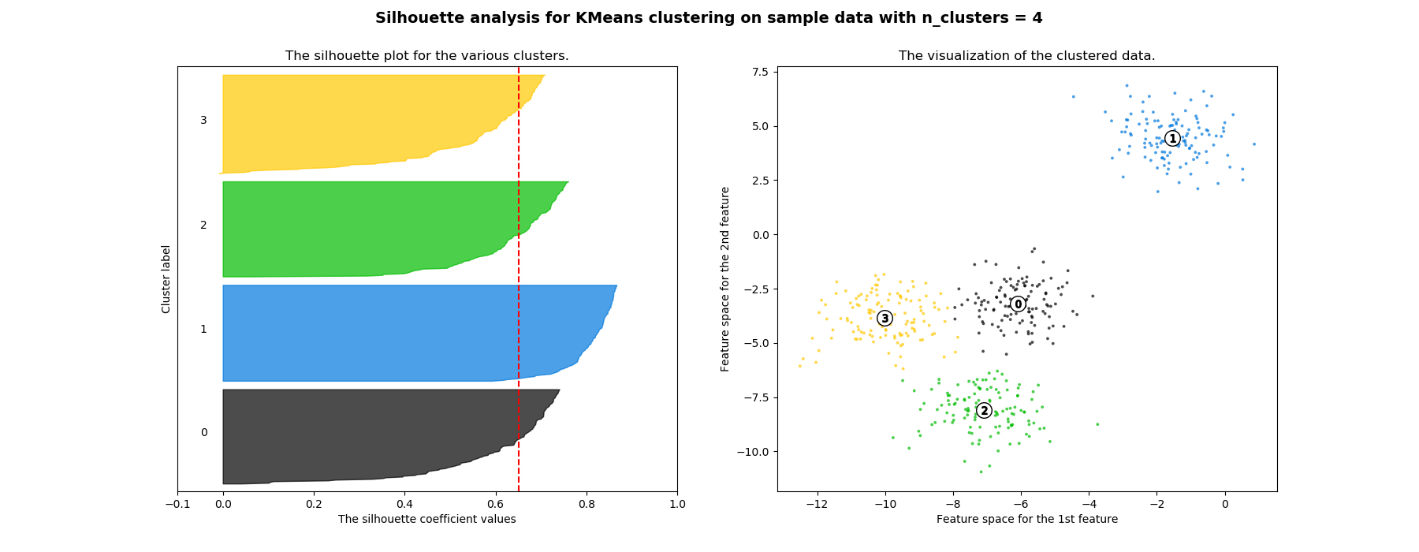
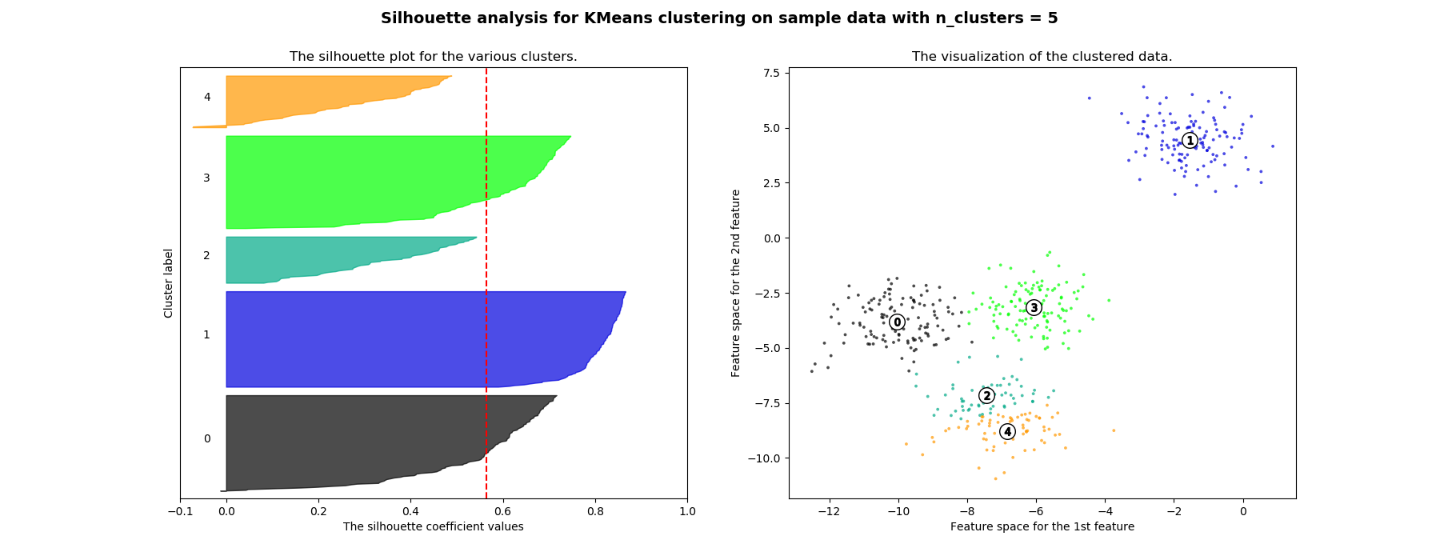
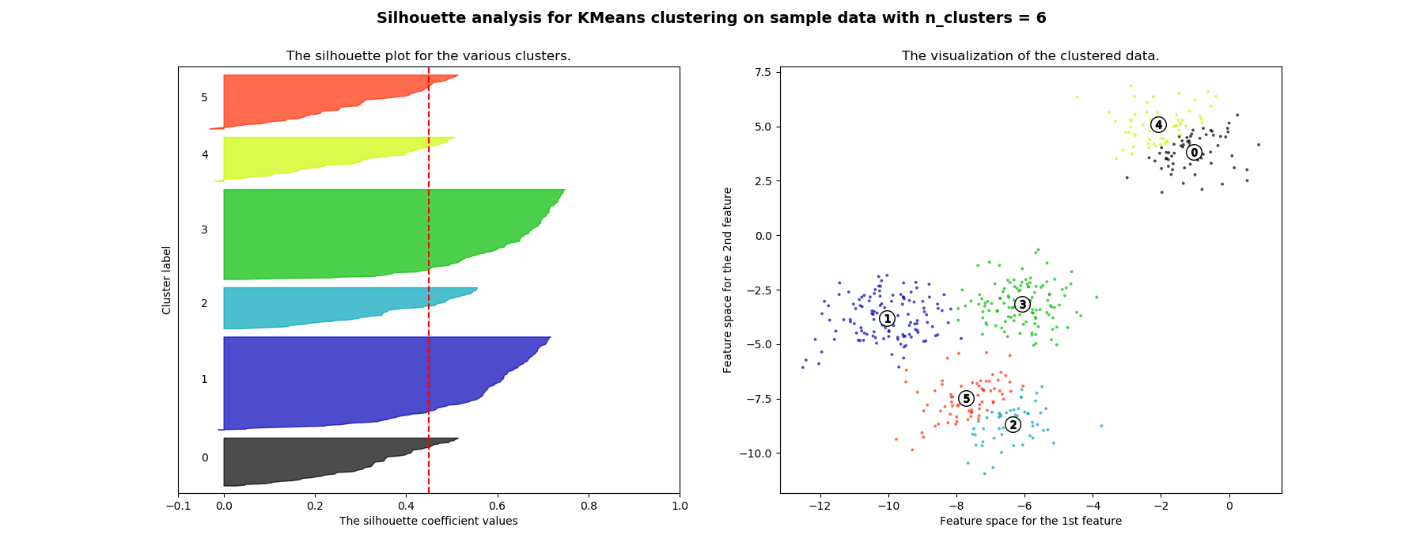
今回の分析は、クラスター数の決め方法を説明します。 シルエットプロットは、3,5,6のクラスター数が、平均シルエットスコア以下になります。シルエット分析は、2と4のクラスター数は高いシルエットスコアになっています。シルエットスコアを使う時に、注意しないといけない事として分離の具合を評価している指標のため、クラスター数が少ないときは高くスコアが出ます。そのため、シルエットプロットも確認し、各クラスターの厚さが似ている事とシルエットスコアの先端部分が超えている事を確認し、クラスター4とします。
Out:
For n_clusters = 2 The average silhouette_score is : 0.7049787496083262
For n_clusters = 3 The average silhouette_score is : 0.5882004012129721
For n_clusters = 4 The average silhouette_score is : 0.6505186632729437
For n_clusters = 5 The average silhouette_score is : 0.56376469026194
For n_clusters = 6 The average silhouette_score is : 0.4504666294372765
実行環境
Python3.6
Scikit-learnを使ったk-means
# ライブラリ
from __future__ import print_function
from sklearn.datasets import make_blobs
from sklearn.cluster import KMeans
from sklearn.metrics import silhouette_samples, silhouette_score
import matplotlib.pyplot as plt
import matplotlib.cm as cm
import numpy as np
print(__doc__)
# サンプルの作成
X, y = make_blobs(n_samples=500,
n_features=2,
centers=4,
cluster_std=1,
center_box=(-10.0, 10.0),
shuffle=True,
random_state=1)
range_n_clusters = [2, 3, 4, 5, 6]
for n_clusters in range_n_clusters:
fig, (ax1, ax2) = plt.subplots(1, 2)
fig.set_size_inches(18, 7)
# シルエット計算と図
ax1.set_xlim([-0.1, 1])
ax1.set_ylim([0, len(X) + (n_clusters + 1) * 10])
# K Meansクラスタs区政
clusterer = KMeans(n_clusters=n_clusters, random_state=10)
cluster_labels = clusterer.fit_predict(X)
silhouette_avg = silhouette_score(X, cluster_labels)
print(“For n_clusters =”, n_clusters,
“The average silhouette_score is :”, silhouette_avg)
# シルエットスコア
sample_silhouette_values = silhouette_samples(X, cluster_labels)
y_lower = 10
for i in range(n_clusters):
ith_cluster_silhouette_values =
sample_silhouette_values[cluster_labels == i]
ith_cluster_silhouette_values.sort()
size_cluster_i = ith_cluster_silhouette_values.shape[0]
y_upper = y_lower + size_cluster_i
color = cm.nipy_spectral(float(i) / n_clusters)
ax1.fill_betweenx(np.arange(y_lower, y_upper),
0, ith_cluster_silhouette_values,
facecolor=color, edgecolor=color, alpha=0.7)
ax1.text(-0.05, y_lower + 0.5 * size_cluster_i, str(i))
y_lower = y_upper + 10
# クラスタ図の作成
ax1.set_title(“The silhouette plot for the various clusters.”)
ax1.set_xlabel(“The silhouette coefficient values”)
ax1.set_ylabel(“Cluster label”)
ax1.axvline(x=silhouette_avg, color=”red”, linestyle=”–“)
ax1.set_yticks([]) # Clear the yaxis labels / ticks
ax1.set_xticks([-0.1, 0, 0.2, 0.4, 0.6, 0.8, 1])
# 2nd Plot showing the actual clusters formed
colors = cm.nipy_spectral(cluster_labels.astype(float) / n_clusters)
ax2.scatter(X[:, 0], X[:, 1], marker=’.’, s=30, lw=0, alpha=0.7,
c=colors, edgecolor=’k’)
centers = clusterer.cluster_centers_
ax2.scatter(centers[:, 0], centers[:, 1], marker=’o’,
c=”white”, alpha=1, s=200, edgecolor=’k’)
for i, c in enumerate(centers):
ax2.scatter(c[0], c[1], marker=’$%d$’ % i, alpha=1,
s=50, edgecolor=’k’)
ax2.set_title(“The visualization of the clustered data.”)
ax2.set_xlabel(“Feature space for the 1st feature”)
ax2.set_ylabel(“Feature space for the 2nd feature”)
plt.suptitle((“Silhouette analysis for KMeans clustering on sample data “
“with n_clusters = %d” % n_clusters),
fontsize=14, fontweight=’bold’)
plt.show()
Total running time of the script: ( 0 minutes 0.496 seconds)

Pingback: PySparkでのk-meanクラスタリング - S-Analysis