
今回は高度な活性化関数のPReLUについて解説と実験します。
目次:
1.PReLUとは
2.KerasのPReLU
3.コード・実験 (ReLU vs PReLU)
4.まとめ
PReLUとは
PReLU は、Parametric Rectified Linear Unitの略称で、ReLUと似ていますが、負のアウトプットがあります。インプットが閾値よりも少ない度合に応じて、負の値を出力するようになっています。特に深い階層において過学習を防ぐ効果があると言われています。プラスとマイナスのどちらにも勾配があるため、学習効率が良いと言われているようです。
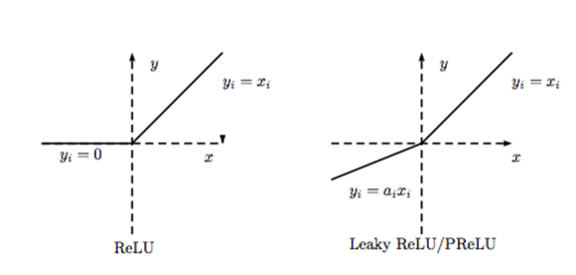
f(x) = alphas * x for x < 0
alphasはxと同じ行列を持つ学習対象の配列です。
PreLUの論文:Microsoft Research
Delving Deep into Rectifiers: Surpassing Human-Level Performance on ImageNet Classification
https://arxiv.org/abs/1502.01852
2.Kerasの高度な活性化関数のPReLU
keras.layers.PReLU(alpha_initializer='zeros', alpha_regularizer=None, alpha_constraint=None, shared_axes=None)
alpha_initializer:重みを初期化する関数。
alpha_regularizer:重みを正則化する関数。
alpha_constraint:重みに対する制約。
shared_axes:活性化関数で共有する学習パラメータの軸。
出力のshapeは入力のshapeと同じです。
3.コード・実験 (ReLU vs PReLU)
概要:データセット:MNIST 60,000の学習データと10,000のテストデータ(28 x 28 pixel)の数字の画像
環境:google colab Python3 GPU
ライブラリ: Keras
モデル:
モデル1 FCN 3 layers (ReLU -> ReLU -> dense)
モデル2 FCN 3 layers (PReLU -> PReLU -> dense)
評価方法:学習時間 Accuracy
ライブラリのロード
# ライブラリのロード
import numpy as np                   # 計算
import matplotlib.pyplot as plt      # グラフ作成
import random                        # ランダム作成

from keras.datasets import mnist     # MNISTのデータセット
from keras.models import Sequential  # kerasモデル

from keras.layers.core import Dense, Dropout, Activation # 属
from keras.layers.advanced_activations import PReLU      # 高度な属活性化関数
from keras.utils import np_utils                         # ユーティリティ
データセットのロード
# The MNIST
# 60,000の学習データと10,000のテストデータ(28 x 28 pixel)

(X_train, y_train), (X_test, y_test) = mnist.load_data()
print("X_train shape", X_train.shape)
print("y_train shape", y_train.shape)
print("X_test shape", X_test.shape)
print("y_test shape", y_test.shape)
11493376/11490434 [==============================] - 2s 0us/step
X_train shape (60000, 28, 28)
y_train shape (60000,)
X_test shape (10000, 28, 28)
y_test shape (10000,)
# クラスの設定

nb_classes = 10
Y_train = np_utils.to_categorical(y_train, nb_classes)
Y_test = np_utils.to_categorical(y_test, nb_classes)
サンプルデータを表示
# サンプルデータを表示

plt.rcParams['figure.figsize'] = (9,9) # Make the figures a bit bigger

for i in range(9):
    plt.subplot(3,3,i+1)
    num = random.randint(0, len(X_train))
    plt.imshow(X_train[num], cmap='gray', interpolation='none')
    plt.title("Class {}".format(y_train[num]))
plt.tight_layout()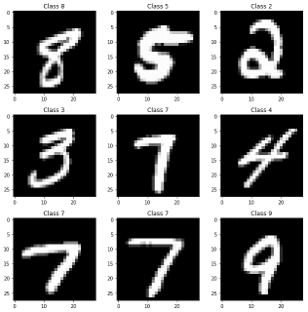
データ加工
# データ加工

X_train = X_train.reshape(60000, 784)
X_test = X_test.reshape(10000, 784)
X_train = X_train.astype('float32')
X_test = X_test.astype('float32')

X_train /= 255
X_test /= 255

print("Training matrix shape", X_train.shape)
print("Testing matrix shape", X_test.shape)
Training matrix shape (60000, 784)
Testing matrix shape (10000, 784)
モデル1 FCN 3 layers (ReLU -> ReLU -> dense)
model = Sequential()

model.add(Dense(512, input_shape=(784,)))
model.add(Activation('relu'))
model.add(Dropout(0.2))

model.add(Dense(512))
model.add(Activation('relu'))
model.add(Dropout(0.2))

model.add(Dense(10))
model.add(Activation('softmax'))

model.summary()
_________________________________________________________________
Layer (type) Output Shape Param #
=================================================================
dense_1 (Dense) (None, 512) 401920
_________________________________________________________________
activation_1 (Activation) (None, 512) 0
_________________________________________________________________
dropout_1 (Dropout) (None, 512) 0
_________________________________________________________________
dense_2 (Dense) (None, 512) 262656
_________________________________________________________________
activation_2 (Activation) (None, 512) 0
_________________________________________________________________
dropout_2 (Dropout) (None, 512) 0
_________________________________________________________________
dense_3 (Dense) (None, 10) 5130
_________________________________________________________________
activation_3 (Activation) (None, 10) 0
=================================================================
Total params: 669,706
Trainable params: 669,706
Non-trainable params: 0
モデル学習
import time
start = time.time()

model.compile(loss='categorical_crossentropy', optimizer='adam', metrics=['accuracy'])
model.fit(X_train, Y_train,
          batch_size=128, epochs=5,
          verbose=1)

e_time = time.time() - start
print ("e_time:{0}".format(e_time) + "[s]")
60000/60000 [==============================] - 4s 73us/step - loss: 0.2505 - acc: 0.9243
Epoch 2/5
60000/60000 [==============================] - 2s 30us/step - loss: 0.1012 - acc: 0.9681
Epoch 3/5
60000/60000 [==============================] - 2s 31us/step - loss: 0.0714 - acc: 0.9770
Epoch 4/5
60000/60000 [==============================] - 2s 31us/step - loss: 0.0551 - acc: 0.9827
Epoch 5/5
60000/60000 [==============================] - 2s 30us/step - loss: 0.0454 - acc: 0.9848
e_time:12.116531610488892[s]
Accuracyの計算
score = model.evaluate(X_test, Y_test)
print('Test score:', score[0])
print('Test accuracy:', score[1])
10000/10000 [==============================] - 0s 44us/step
Test score: 0.06801066087269574
Test accuracy: 0.9799
モデル2 FCN 3 layers (PReLU -> PReLU -> dense)
from keras.layers.advanced_activations import PReLU

model = Sequential()
model.add(Dense(512, input_shape=(784,)))
model.add(PReLU())
model.add(Dropout(0.2))

model.add(Dense(512))
model.add(PReLU())
model.add(Dropout(0.2))

model.add(Dense(10))
model.add(Activation('softmax'))

model.summary()
_________________________________________________________________
Layer (type) Output Shape Param #
=================================================================
dense_4 (Dense) (None, 512) 401920
_________________________________________________________________
p_re_lu_1 (PReLU) (None, 512) 512
_________________________________________________________________
dropout_3 (Dropout) (None, 512) 0
_________________________________________________________________
dense_5 (Dense) (None, 512) 262656
_________________________________________________________________
p_re_lu_2 (PReLU) (None, 512) 512
_________________________________________________________________
dropout_4 (Dropout) (None, 512) 0
_________________________________________________________________
dense_6 (Dense) (None, 10) 5130
_________________________________________________________________
activation_4 (Activation) (None, 10) 0
=================================================================
Total params: 670,730
Trainable params: 670,730
Non-trainable params: 0
_________________________________________________________________
モデルを学習
import time

start = time.time()
model.compile(loss='categorical_crossentropy', optimizer='adam', metrics=['accuracy'])
model.fit(X_train, Y_train,
          batch_size=128, epochs=5,
          verbose=1)

e_time = time.time() - start
print ("e_time:{0}".format(e_time) + "[s]")
Epoch 1/5
60000/60000 [==============================] - 2s 40us/step - loss: 0.2133 - acc: 0.9370
Epoch 2/5
60000/60000 [==============================] - 2s 34us/step - loss: 0.0779 - acc: 0.9758
Epoch 3/5
60000/60000 [==============================] - 2s 32us/step - loss: 0.0485 - acc: 0.9845
Epoch 4/5
60000/60000 [==============================] - 2s 33us/step - loss: 0.0366 - acc: 0.9884
Epoch 5/5
60000/60000 [==============================] - 2s 33us/step - loss: 0.0254 - acc: 0.9917
e_time:10.686483144760132[s]
Accuracyの計算
score = model.evaluate(X_test, Y_test)
print('Test score:', score[0])
print('Test accuracy:', score[1])
10000/10000 [==============================] - 0s 43us/step
Test score: 0.07057499322853983
Test accuracy: 0.9794
4.まとめ
今回は 高度な活性化関数 PReLuを解説しました。 MNISTのデータセットでモデルを作成して、比較しました。ReLuとPReLuのモデルは制度が同じくらいですが、PReLuの方が早い結果になりました。常に精度が良いというわけではありません。

参考:以前の活性化関数について解説しました。
詳細:https://keras.io/ja/layers/advanced-activations/